How to Upload Designs to Brother Se400
This post may contain Amazon Acquaintance and other partner affiliate links. Equally an Amazon chapter, I earn a small committee from these links at no additional toll to you.
Here is a quick step by pace tutorial on how to download embroidery files from your figurer onto your embroidery machine to use for projects. This post will specifically discuss a Blood brother machine, still, the process is the same for near others!
This post may contain Amazon Associate and other chapter links.
As an Amazon affiliate, I earn a small commission from these links at no additional cost to yous.
What is an Embroidery Design
We have talked a lot about SVG files hither on this site and those are used for cutting machines like a Cricut or Silhouette to tell the machine where to cut.
Embroidery machines have files that tell the machine where to sew. Embroidery designs are fabricated up of dense stitches of different colors of thread that create a design.
What is an Applique Design
An Applique is when you take a shape or design in textile and layer it on pinnacle of your terminal cloth piece. The layers are stitched together. Many times you lot finish the design by embroidering the edges with a satin run up.
Applique Files will have several layers of different types of stitches to help you place your applique and embroider the edges for a completed look!
Where to purchase embroidery & applique designs:
Here are my favorite places to grab the cutest embroidery applique files! Unlike embroidery machines have unlike types of embroidery files then be certain you read up which types your motorcar takes!
When yous purchase them, they are commonly offered in ALL the file extensions!
- Etsy
- Then Fontsy
- Embroidery Bazaar
- Planet Applique
FIND MORE VIDEOS ON MY YOUTUBE CHANNEL Hither
How to Transfer Embroidery Applique Designs from Reckoner to Embroidery Automobile
Fourth dimension needed:five minutes.
Step by stride tutorial on how to go purchased embroidery applique designs from your calculator onto your embroidery machine to complete your projects.
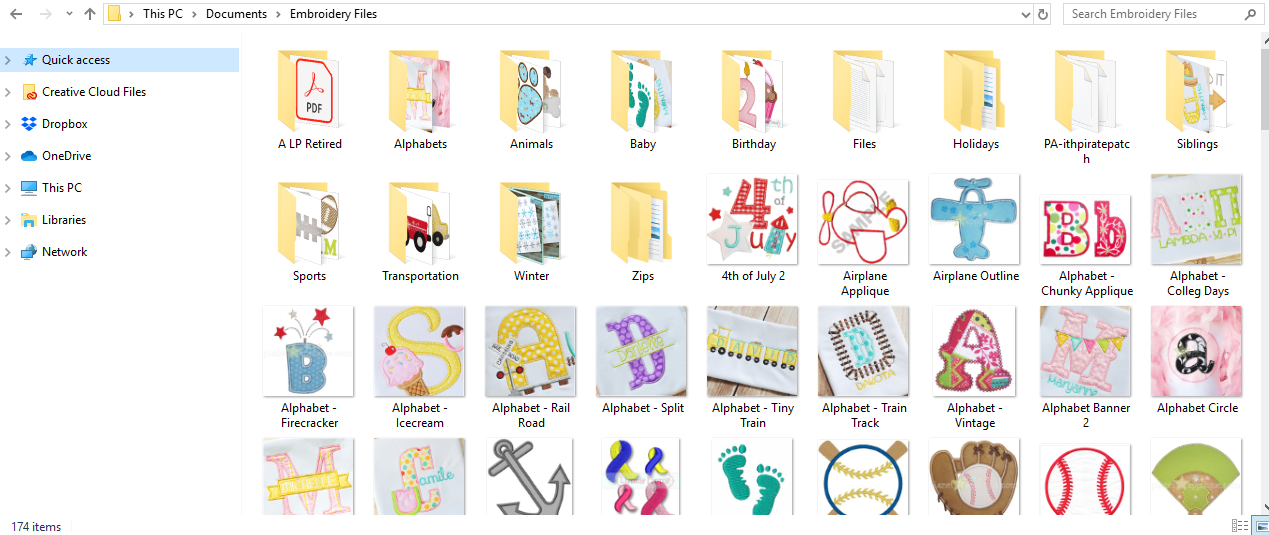
- Download your Embroidery Applique File
I similar to create a binder on my estimator and keep all my embroidery files together in one location. I download all my purchases to this binder.
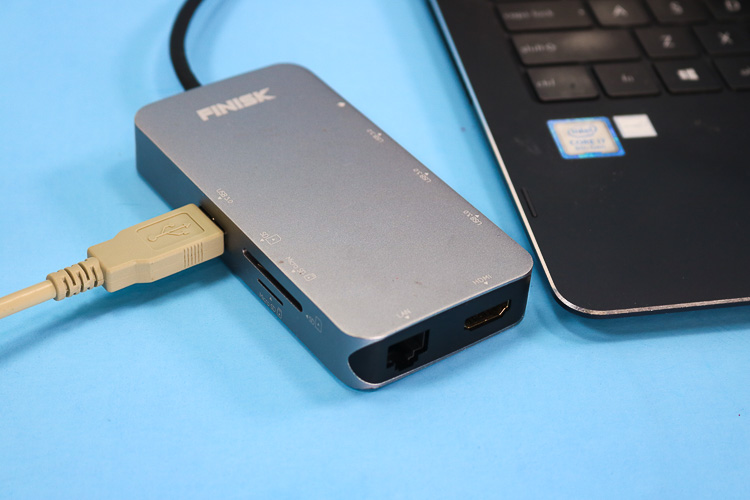
- Connect data sync cord to your calculator
Connect the USB end of the data sync string (that came with your machine) to your computer.
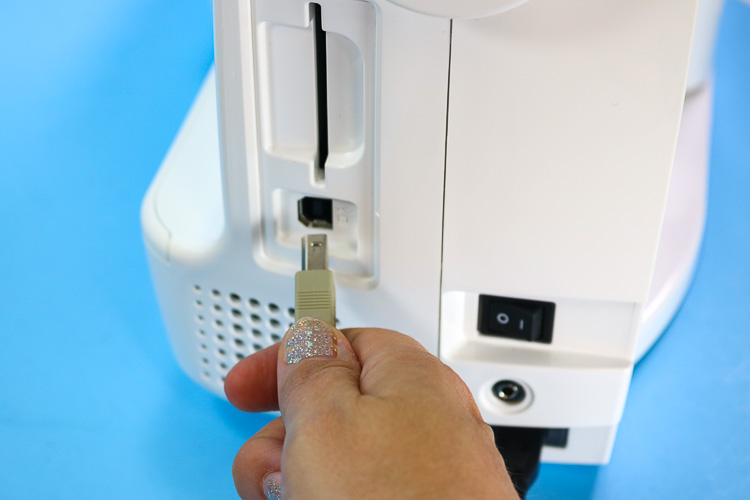
- Connect data cord to your machine
With your machine OFF, connect the square end of the information cord into the opening on the side of our car.
- Turn your car on.
When you turn your machine on a window might open up on your computer showing you lot the "contents" of your machine. If it does non open automatically, caput to your file explorer and locate the external drive and double click to open up it up.
- Open Folder of Designs
Open up your folder of designs we talked nigh in step one side by side to the open up window of your car that you opened in step 4.
- Drag & Drop Designs
Drag designs from your folder into the automobile's window.
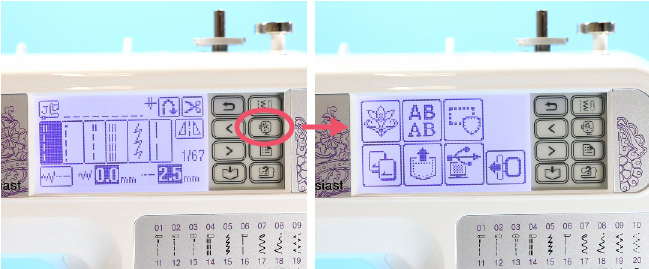
- Open Embroidery Menu on Machine
On the impact screen of your embroidery machine, select the icon that looks like an embroidery hoop. That volition open a second screen that is your Embroidery Menu for your machine.
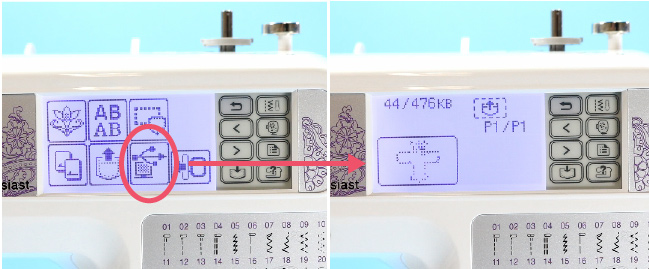
- Upload your Design into your machine
From the Embroidery Menu, select the icon that looks like a calculator with a data cord symbol. That will then open and show the designs that you added to the machine window on your calculator.
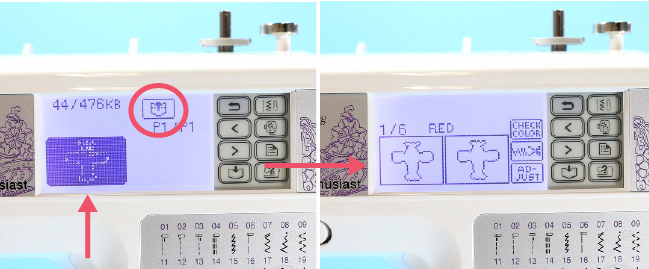
- Select your Design & Upload
Select the design yous want and so click the upload button (pocket with an pointer in summit correct) to add it to your machine. A window will open and tell yous the first thread color and sew information technology will perform (recall appliques accept many layers) Y'all can now proceed to applique from here past pressing the Green push button.
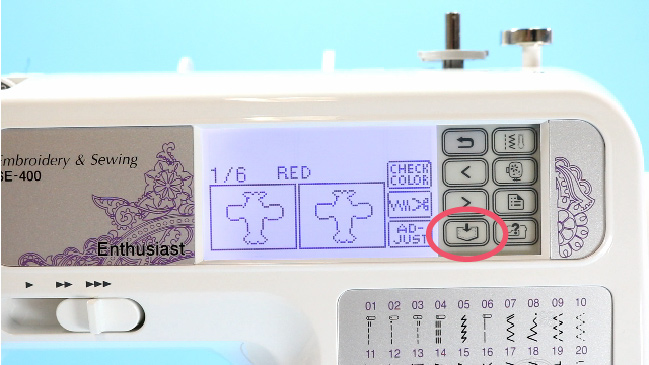
- (Optional) Save your pattern to your machine
If this is a blueprint you remember you will use often, you can save it to your car and so that you do not have to practice this process each time you need it. If it'south just a 1-off, I propose not saving to exit room on your machine for popular, used often designs. To save click the pocket looking icon with the approachable arrow in the right-hand button menu.
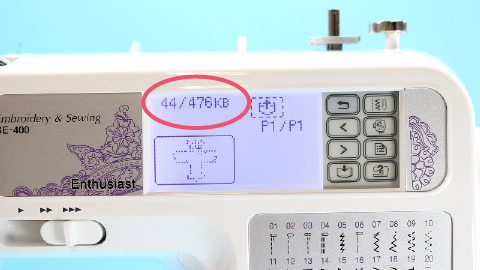
That is how you lot upload designs to your embroidery machine, specifically your Brother SE400 or SE600 machine. The SE400 can hold upward to 12 designs or 512KB of information in its memory.
To see how much memory you have left or how much a design is taking up, let'due south look back at this photo of when we opened the window showing our designs. The offset number is the designs retentivity usage and the 2nd number is what is left on your car.
Tomorrow I will share my tutorial for how to make an embroidered applique using your embroidery automobile! We will stitch up this beautiful airplane!
More EMBROIDERY PROJECTS You lot MAY Like:
Pin HOW TO TRANSFER EMBROIDERY Motorcar FILES
Reader Interactions
Source: https://www.thatswhatchesaid.net/how-to-transfer-embroidery-files/
0 Response to "How to Upload Designs to Brother Se400"
Post a Comment